Sunday 31 July 2011

Moment of Truth

A scary moment but thankfully I was able to pick my boat up by the coaming with no creaking and cracking sounds and more importantly the coaming still attached.
 I tied my boat off upside down to a couple of A-frame ladders and dressed up like some psychotic mad man to begin the repairs on my boat.
 I detached the coaming forward of the seat and cleaned off all the old resin and what looked like hot glue that previously held it on.  I then used a Dremel to grind off any old gel coat that was loose and cleaned up the edges.
I mixed the epoxy and hardener 5:1 and added roughly 10% of microfibers into a plastic measuring cup and mixed it up into a fairly thick runny paste.  I then used a the end of a chisel to open up the gap between the coaming and the lip and used a syringe to pour in the resin mix.  I taped up the outside of the coaming with insulation tape to stop the glue coming through.
 Under the deck I used a Dremel to grind down the loose gel coat and remove the gel coat around the splits in the lip/deck.
 Before (above)... After (bellow)  I added four layers of fibreglass to cover the cracked gel coat you can see above after I ground as much of it away.
I also added layers of fibre glass around the splits near the coaming to reinforce them (bellow).  I then sanded down the area for a smooth finish (the white bits are from sanding not air bubbles).  I left it to cure overnight and then came the moment of truth.  It seems to have done the job.  I've given it a good wiggle, picked it up, stretched the spray deck over it and it seems solid enough.
For my first experience with fibre glass I enjoyed it.  That was until the plastic cup I was holding started smoldering and disintegrating in my hand.  Epoxy is lethal!!  That's why I only got to four layers and the last one was rushed.  Thanks to everyone that helped out, and a big thanks to Damiano off Gnarlydog News  for his supurb instructions. 

Friday 29 July 2011

Not As Bad As First Thought...

I removed the seat in preparation for tomorrows repairs and gave the coaming a little tug.  It seems the coaming has come away from the cockpit lip and is not a crack after all.  The edge of the coaming and underneath of the deck had been gel coated white.  Where the coaming has parted with the lip it looked like a split.  There is of course the two hairline cracks to sort in the lip itself.  I think the plan now is to remove the coaming, grind of the old gel coat and gunk, fibreglass the rim then glue the coaming back on.

Tuesday 26 July 2011

Cracking up!

After last nights Monday Club paddle down the bay my boat was looking worse for ware.  When I bought this boat there were a few hair line cracks around the cockpit coaming and the coaming itself looked like it had previously been repaired.  After a few roles it seems these cracks have become worse and the coaming is now moving.  I was hoping it would hold out until I got the fiberglass for my boat build but it looks like I might have to put my hand in my pocket a little sooner.  These pictures are for the purpose of the discussion on the sea kayak community pages.
Crack on the outside under the coaming lip.
Again under the coaming lip but on the opposite side.  This one looks like it has been previously repaired.
 From the inside looking up toward the deck where the coaming joins the deck.  Bearing in mind this is mega zoomed in.
 Again same angle but a different spot and a different crack.
 This is to show how the coaming joins the deck.  Also some sort of adhesive or sealant previously used?
This crack is under the deck roughly above my thigh.  It looks worse than it is.  I think this is just some added glass that has flaked off, looks almost like when dry paint cracks and comes off.  It doesn't seem to have damaged the actual deck.  It looks like the added glass which was used to install the skeg slider.

Saturday 23 July 2011

Petrel Build #6 - Stripping the Hull

Granted it may look more like the Trojan war horse the Greeks used to deceive the Trojans...(it even has legs)
...But with some deceiving of my own and a little help from photo-shop it looks more like the up-swept bow of a Viking ship (bellow).  All I've done here is flipped the photo upside down and shaded the ends which will eventually be cut, sanded and capped with an outer stem.
The Stern (bellow) is proving to be a little difficult.  While the strips at the bow are still running straight and vertically the strips to the stern are being beveled, twisted, clamped and stapled.
I'm now at the point where all the strips have met the chine on the hull and will start to run horizontally.  It's going slower than I had hoped, although this is my busiest time of the year.  Maybe I should have left it as a winter project.  I try to fit at least a couple of strips each visit and slowly but surely I am making some progress.
The bow is almost filled in bar one small slither of a strip each side.  You can see here I'm not afraid to use the staple gun.  I'm looking to build a boat not a piece of furniture, small staple holes are evidence of the workmanship gone into it.  The next post on the boat build should see me fitting the keel strips hopefully filling in the rest of the hull.

Tuesday 19 July 2011

Monday Club

I relaxing paddle in and around the bay with some of the other guys who meet up on a Monday evening.  Nice to actually get the chance finish work early drop the kids off and paddle away the woes of life, and it's only Monday!  
That'll be Up & Under's new pride of the fleet, the glass Etain in front.  It was good to find out how my boat sat in the water, apparently a little high (as expected) but a bit of loading up should sort that. 
The other pride of Up & Under, Norman and Elan, smile :)  Good fitness trying to keep up with Elan on the way back even if he did have a bad shoulder and was paddling 'slow'.  Finished off nicely with a bit of arm work back at the pub.

Sunday 17 July 2011

High Winds & Doodles

I spent yesterday afternoon washing and shinning up my new boat and while it was out by the road I thought I might as well load it up and head down the road to Aberthaw.
 I knew the forecast was for strong winds (F6-8 Beaufort) but Aberthaw is usually sheltered from the worst.  If this was sheltered I would have liked to have seen it down at Nash Point!
Absolutely no chance of launching, especially in my new boat.  An hour or so earlier an there may have been a bit of sand to launch off.
So I was stuck at home bored and when I'm bored I doodle, what do you think? I thought it would be fitting having a white bird for a white boat and if I can line it up with the water line the fish should dip in and out of the water on the move.

Sunday 10 July 2011

First Launch

Today was the first 'official' launch of my new boat.  Just a simple trip on known territory to get a real feel for the boat and what it's capable of.  I decide to launch from the Knap Barry and aim for Penarth. 
I wade into the shallow water to get in as to not further add to the scratches on the hull.  There's a lot more thinking involved with a glass boat.  Doesn't help that everywhere around here is rock or pebble or worse, mud.
I paddle out to the point marked with a fixed buoy mainly fiddling with the outfittings and getting a feel for the boat.
I make my way across each of the bays around Barry only looking back to take pictures of Nells point watchtower and the lighthouse on the harbour walls.
I have a nose around the inner harbour at the Barry life boat before continuing my journey.
Out of the harbour as I make my way toward Sully Island there is a fairly brisk wind coming from behind.  Looking back the sea is awash with white horses, great for surfing! I can't believe how confident this boat makes me feel.  In my Easky I would be on my guard as the waves come up from behind trying to tip the boat and turn it into the waves.  With this it goes where I aim it, and with so much stability.  Catch a wave and it felt like I was on rails, it just dug in and absolutely drove on forward.  For once I felt in control of my boat and the prospect of wind on tide on the way back brought a big grin to my face.
With all that excitement I decide to stop off on the nice shingle beach at Sully Island, Oystercatchers clearing the way as I come in.
 My new seating arrangement.  I cut up and old camping mat as it doesn't get used anymore now with the self inflating gizmo's.  It's stuck down with some heavy duty Velcro and works a treat.  I also re-threaded the back rest and stuck down the hip pads.  I can honestly say no sore bums or back all the way there and back.
 More shots of the new boat, I cant get enough.
 I'm gonna have to remove that nasty black sticker on the bow and touch up the red tape.  I'll have to get some nice red Welsh dragons to match.
 Moving on toward Lavernock the tide slows down as it nears high water.

I make a perfect landing without touching a single rock and stop off for a for a cuppa coffee and a Snickers.
Heading back was great fun, the tide was ripping nicely around all the headlands kicking up some great chunky waves.  Paddling into the wind seemed a breeze (excuse the pun).  The bow lifted or cut thorough  every wave instead of burring into it like my Easky.
 A quick stop off at sully again to check for leaks.  The rear hatch was dry as a bone considering it's got two holes in it for the rudder wires.  Same with the day hatch but the front hatch had about a cup of water in it.  I put it down to the hatch lid as it looks very old and flimsy.  I've swapped it with the Easky hatch lid and see what happens next time.
 Paddling out across the bay toward Barry I get told to slow down as some sailing boats cross my path.  Never been told to slow down before!
Race rounding Nells Point.
More fun in the waves before making a landing back at The Knap and reminiscing on a great day.  I can't wait to get it back out, role on the weekend!

Saturday 9 July 2011

Petrel Build #5 - First Strips

The first strips are on.  I spent a while setting up the forms on the strongback and securing them with cleats.  I then cut and shaped the stem pieces seen here on the bow.
The first two strips (on each side) are the most important because the rest of the strips follow in place.  The lower one is the sheer strip.  This is the strip that joins the deck and the hull together, where you would find the seam tape on a glass boat.  I'm using cove and bead strips so first I had to remove the bead from the sheer strip.  Then the strip had to be beveled so when the deck is laid there is a perfect seal between the deck and hull.  The sheer strip is also beveled thinner at the ends to allow it to bend.  The upper strip is placed almost straight, more in line with the chine.  This makes adding the following strips much easier without having to bend each one.
This is the progress I made earlier today.  Both sheer and second strips are on both sides and I have started building up the strips toward the bow on the left.
See how the strips are following the second strip which is placed in a straight line.  Each strip is beveled to a point to fit snug between the sheer.  You can also see here I'm using a mix of staples, masking tape and spring clamps to hold the strips together while the glue sets.
The sharp bevel point clearly seen above with the darker strip.  I'm getting really mess with the glue and I have a feeling I'm going to have a few small gaps to fill.  So far I can honestly say it's going easier than expected but progress is very slow.  I took me about two hours to fit two whole strips and two beveled strips today.  A Special thanks to Barry at FourPosters for supplying the strips and getting them to me packed so well.  The wood looks lovely, shame my handy work is spoiling them.

Thursday 7 July 2011

Here's to New Adventures

And here she is....
An 18.2 ft long fiberglass Tahe Marine Revel.  I know, what happened to the Valley Etain?  To be honest I wasn't happy settling for a plastic boat and when Martyn mentioned there was a second hand Revel at Brookbank I jumped at it and put a deposit down the next day.   I spent 3 hrs in the van traveling up to Warwick for a demo and bring her home.  Apparently there was a very big waiting list of people hoping I wouldn't buy her, as it was a very good deal at £695!
First impressions were it was a lovely looking boat, beautiful sharp lines unlike any other boat I've seen.  A little hard to distinguish here on camera, it's going to be a nightmare with exposure on a white boat.  I like the white and the red nicely matches my drysuit and BA.  There are the usual scuffs on the hull as you would expect from a 2nd hand boat but nothing serious.  Up on deck it is immaculate.  There are a few chips out of the read seam that joins the deck and hull, again nothing really that noticeable.
The one review that I read before hand was that on the Solent Sea Kayaking blog.  This boat is advertised as a boat for medium to large paddlers and the review backs that up saying the cockpit feels big and roomy.  That's bad for me as I am neither big or roomy, so I was a bit worried it might be too big.  The cockpit rim itself is really small, I had to buy a new spray skirt as mine was far to big.  Sat in the seat it felt fine, in fact smaller than my Easky LV.  I've since added a small layer of foam for a nice snug fit.  The knee supports are the cockpit coaming itself which makes you feel a part of the boat, again a nice fit. 
Another point that was mentioned in the review was the cockpit coaming was on the thinner sharper side.  I would second that, I was a little nervous to put any pressure on it.  having said that I'm a bit nervous with the whole boat coming from a plastic boat.  On closer inspection it looks like the cockpit coming may have been removed at some point and re-attached.  There is no water coming in but I will probably add another few layers of fiberglass just to add a bit of strength and a smother finish.  Maybe that's why it was so cheap???
Now here is where the volume is and where it is big and roomy.  I have size ten feet and they are no where near the deck.  Lined up against other boats the deck does look higher volume although not like the hump on the Rockpool boats.  The foot rests felt a little small compared to what I have in my Easky but looking at this picture they look like they me be on upside-down??
The boat tracks well without the skeg although it wasn't exactly testing conditions down the bay.  The boat looks like it previously had a rudder but the hole in the back makes a perfect point to thread my lock through.  The skeg is metal and bangs about like mad when fully deployed, I'm going to add some foam to the inside of the skeg box to see if that helps.  The skeg slider is lovely an smooth.
Out on the water it is very stable, I was instantly pleased with a grin from ear to ear (and I got big ears!).  Paddling about the bay there was a tiny bit off sadness there, I'm gonna miss that read bow of my Easky I've become so attached to.  It is at home on a hard edge and gives plenty of confidence, I would go as far a saying it was as good as the Etain.  At just over 18ft long you would expect it to be difficult to turn but with a hard chine and rocker it turns beautifully.
The sides of the deck are cut away, same as on the wooden boat, which I believe originates from the Greenland kayaks.  This is great as I was always hitting the deck with my paddles.  It is also great for green;and style paddling.  I think every boat should have this feature.  You can also see the skeg slider in this picture.  The reviewer said this caused a problem as it was a little protruding, I tried hitting in it on purpose in my turns and paddling and I didn't find it a problem at all.
In this leaned back photo the shape looks a bit odd,  mainly down to the cut out in the sides of the deck.  There's my new snug fitting skirt.
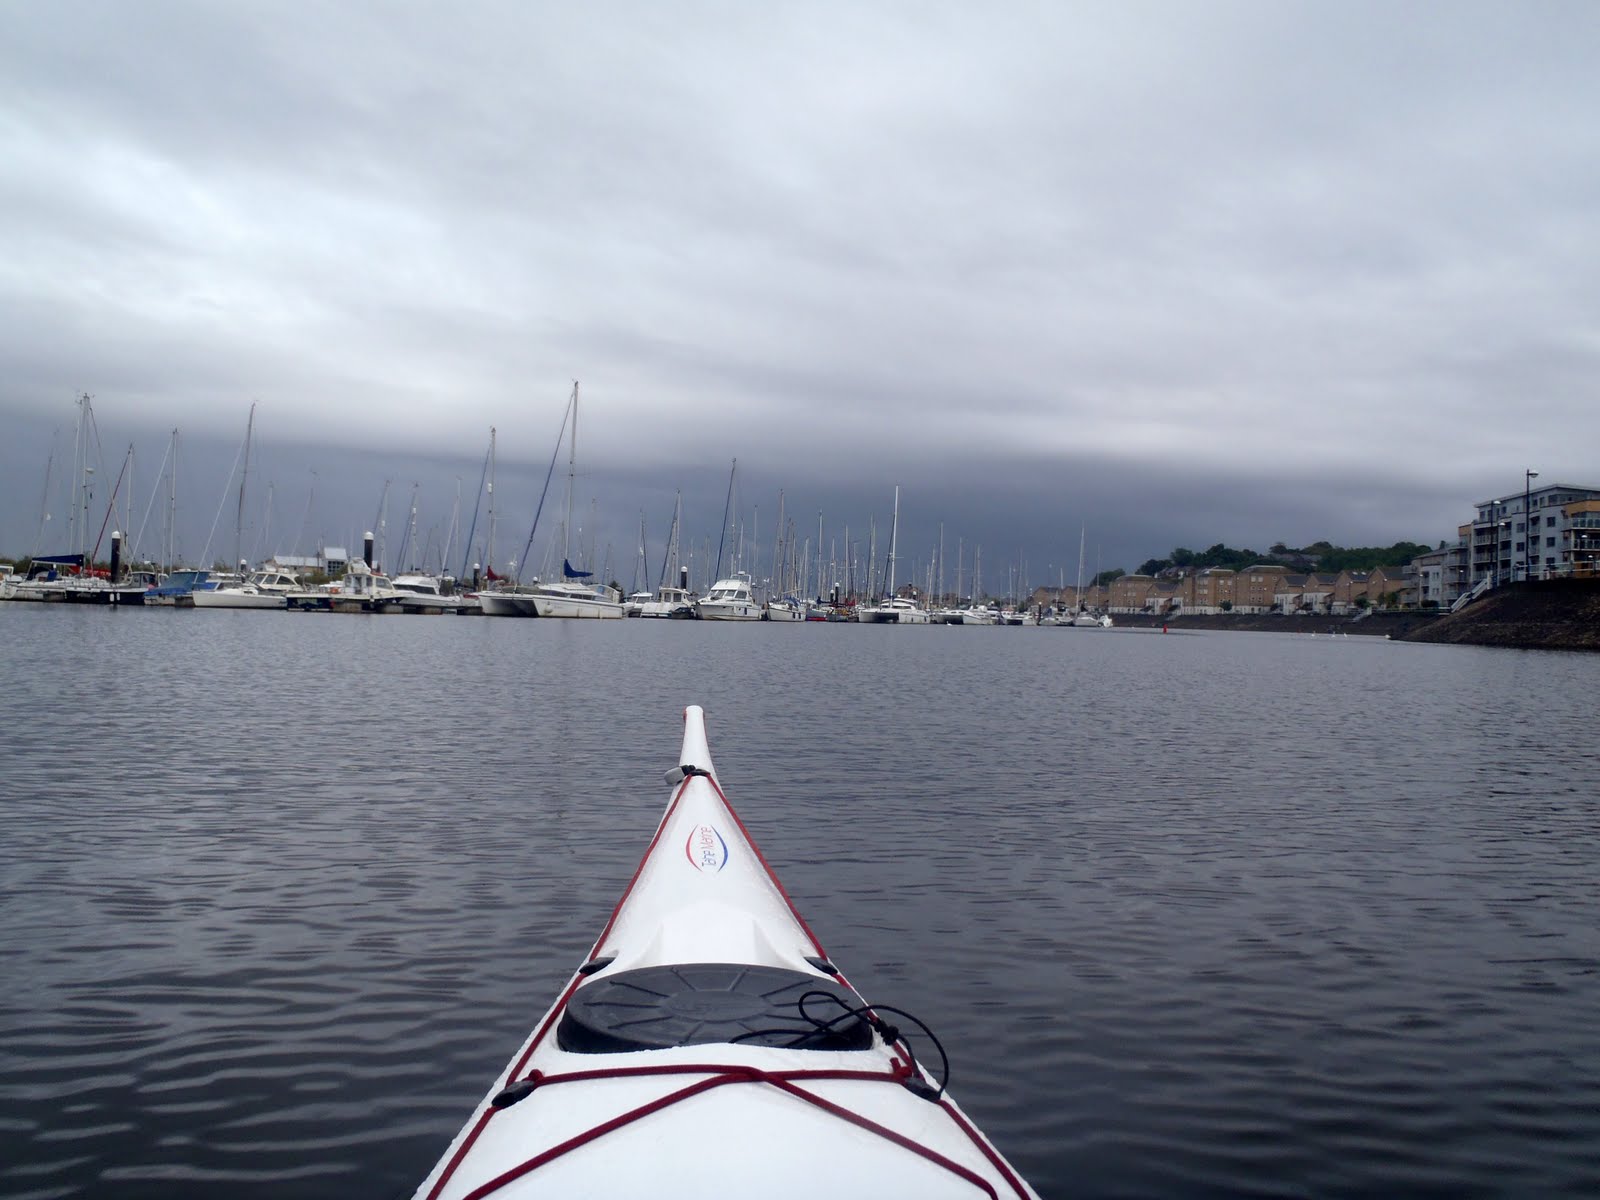
"Five knots, piece of pi$$!"  I didn't have my GPS to judge my speed but it felt like I was flying along.  I felt like there was a lot less drag than my Easky also. 
I was trying to get a picture of how my boat sat in the water whilst I was in it.  The wake as I was paddling seemed to be starting from the toggle just after the front hatch where it starts to broaden out.
A slightly smudged logo.  In all I am extremely chuffed, a glass sea kayak for the same price as my Easky.  A special thanks to Martyn for the heads up on the boat.  A few small jobs to do, possibly swap the footrests over, I've added hip pads and set up the backrest, a bit of foam in the skeg box, maybe reinforce the cockpit coaming and a bit of foam on the seat.  Who know where she will take me but I look forward to new adventures to come.